Restaurant food photography is a great way to let your brand speak for itself. Engaging your audience with well-planned, appealing, vibrant, and focused food and menu photography is a vital component to reaching recurring guests, attracting new followers, and widening your social media net.
We have gone straight to our expert source. Ken Fletcher is the in-house photographer/videographer at long-time client, Farmers Restaurant Group. He produces all of the images and video content FRG uses across their seven restaurants (and counting). His superior eye and remarkable talent behind the camera and the video lens have brought the company recognition and accolades, and we are thrilled to share his top food photography tips and restaurant photography tips here.
Ken’s first tip: Invest in the right Equipment. Sure, Ken agrees you can shoot great food photography with an iPhone, but if you are really looking to up your food photography game, consider investing in some essentials. A ‘DSLR’ (i.e. Digital Single-Lens Reflex) camera, with a macro lens, will allow you to really focus-in on the details. The addition of a tripod is also a great tool to let you to keep your framing, while adjusting what’s in the scene, allowing for more precision. Ken also suggests downloading images directly from your DSLR to a computer or monitor on-site, this will allow you to see far more detail than what is visible on a camera/video display screen.
Next up: Find your Light. “To capture accurate and appealing photographs of food, you need to focus 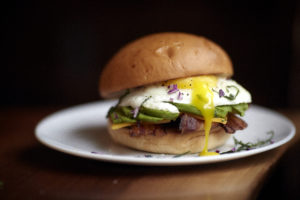
on the light that lands on your subject,” says Ken. Artificial lighting can sometimes distort the colors of the food, so often natural lighting is your best bet. Be wary though of too many light temperatures in your scene. Window light is often ideal, though direct sunlight can overpower and cause harsh shadows. Focus on the quality of light not the intensity. Oftentimes, a slightly darker area will yield a better result than you’d expect, as your camera will compensate. As always, experiment first with sample shots to achieve your desired results.
Thirdly: Style your Food. “When styling,” Ken adds, “think about complimentary colors, removing everything that  distracts, and allow the focus to remain on the food (or drink) itself.” Work with different backgrounds and props to enhance your image and create visual diversity. Familiarize yourself with simple techniques like “Rule of Thirds,” in which your focal subject should line-up with the “thirds” of your frame. Also, use what you have to your advantage. For example, Ken likes to use cake stands, baking sheets, linens, newspaper, coffee cups, plates, wine glasses, various textures… anything that will add to the scene to help achieve his vision. Remember to keep your theme in the forefront, adding elements to tie it all together cohesively. Ken’s final styling recommendation: Don’t be afraid to make a mess. Oftentimes, messy food can be more appealing, and draw a viewer in, than stagnant items.
Lastly: Have fun! Food photography is all about experimentation and building a scene. Don’t be 
frustrated if the first image you take isn’t amazing. Ken suggests identifying what is missing or overpowering and adjusting as you go. Being able to evolve your scene is essential for successful food photography. The food doesn’t move, so it’s up to you to make changes. If things aren’t working the way you want, shake things up. Find new light, new props, new food, or start your styling again from scratch. But, always have fun. The fun, the creative spirit, the subject – will always translate.
*all photography courtesy of: Ken Fletcher, Farmers Restaurant Group.